Congratulations on transitioning from Universal Analytics to Google Analytics 4! Surviving the transition from Universal Analytics (UA) to Google Analytics 4 (GA4) is a significant achievement with many steps and considerations – some of which can be easily overlooked.
GA4 offers a more advanced and comprehensive approach to tracking and analytics, allowing you to gain deeper insights into user behavior and make more informed decisions. In order to maximize the benefits of GA4, however, you need to make sure that your GA4 property settings and your GA4 events tracking are set up properly.
The best way to do that is to conduct an audit of your GA4 settings and events, which, depending on your setup and business goals, can – and should – contain up to 100 checklist items or more.
To get you headed in the right direction, though, I’m sharing a handful of items to consider in ensuring your GA4 setup is optimized and you’re able to gain better insights from it:
1. Make Sure Your Data Retention Limit Isn’t Set to the “2 Months” Default Setting
The data retention setting allows you to choose how long Google Analytics 4 retains user-level data before it’s automatically deleted. This setting can play an important role in compliance with privacy regulations like GDPR, as it can ensure that user data is not being retained for periods longer than necessary.
GA4 offers two data retention period options: 2 months (the default setting) and 14 months. It is very important to consider your specific reporting and analysis needs before you choose to decide on your data retention setting. If you require access to long-term historical data, like many, you may opt for the 14-month retention period. In this case, because it’s not the default, you’ll want to make sure you change this setting.
To change the data retention period, go to Admin then Data Settings then Data Retention to see what your current settings are. If it is set at the “2 months” default setting and you want to change that selection, simply click on the dropdown menu, and select “14 months,” as shown below:
2. Add Referral Exclusions
If you have multiple subdomains or third-party payment gateways, and you don’t want them to inflate your referral traffic data, then you need to set up referral exclusions in your GA4 settings. Excluding this traffic will give you a more accurate account of where your genuine referral traffic is coming from.
Go to Admin then Data Streams then Configure Tag Settings then List unwanted referrals to see what referral domains are currently listed. If there are no domain or subdomain entries in this section (like the image listed below), then you need to update this setting.
3. Ensure Your GA4 Events Setup and Naming Follows Best Practices
In addition to confirming that your events are firing properly and that your Google Tag Manager (GTM) tracking code is correctly installed across your website, it is also very important that your GA4 event names follow these recommended best practices:
- Make your event names descriptive so that they clearly represent the action you are tracking. Avoid generic or vague names.
- Event names should all be lowercase, with underscores placed between the words (i.e., no spaces between the words should exist).
- Avoid using special characters in event names to ensure compatibility with GA4.
Furthermore, you should make sure that you take advantage of the increased number of allowable parameters (up to 25!) that can be entered in each of your tagged events. My recommendation is that almost every event should have at least four core parameters contained in the events tag, so you are able to see what the click text, click URL, page path and page URL values are for each event.
Here is an example of what my recommended format of a “PDF download” event tag with those four parameters would look like: 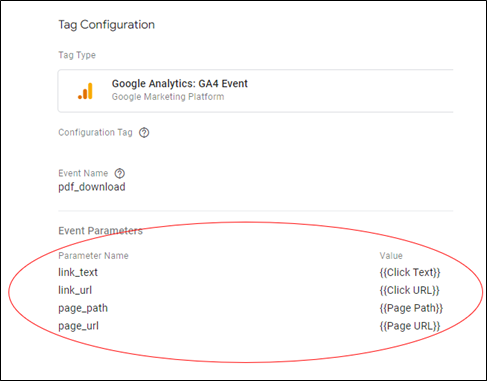
4. Set Up Custom Dimensions That Correspond with Your GA4 Events
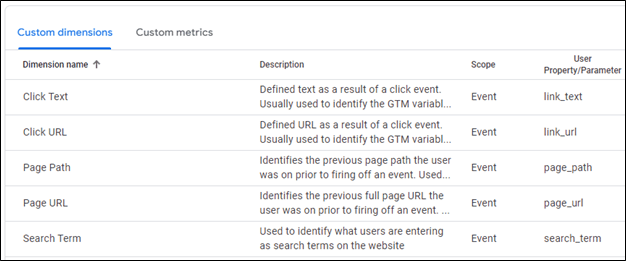
Once you’ve completed your GA4 events review and (hopefully) followed my parameters advice, you then need to make sure that you have set up the proper number of custom dimensions in your GA4 property that correspond with your GA4 events parameters. If you skip this step, then you will not see the important values that are being captured by these parameters, and you will therefore be missing out on the ability to gain deeper insights into user behavior.
Go to Admin then Custom definitions to review your current custom dimensions setup. If there are no entries and it looks like this screenshot below, then you need to add custom dimensions.
To help get you started, here is an example of some core custom dimensions that I would recommend being installed into any GA4 property:
 Setting up GA4 custom dimensions plays a very important role in maximizing the value of your custom events tracking, and this will, in turn, enable you to make better data-driven decisions.
5. Mark Your Key Events as Conversions
A "conversion" in GA4 is an event that is essentially given a higher profile due to its importance to the business. These can be imported into platforms like Google Ads to make campaign management more efficient, among other analysis benefits. Some examples of conversions could be form submissions, purchases, or even PDF downloads.
Go to Admin then Conversions to see what conversions you currently have set up. If it looks like this (see below), then you haven’t selected any of your events as conversions.
It is very important for you and your colleagues to initially review your list of GA4 events to determine which ones are in line with your KPIs before selecting any events as conversion. Once that review process is completed, setting up conversions is very simple. Go to Admin then Events, and there you will see your current list of events with a toggle button listed to the right for each event. For events that you want to mark as conversions, simply move the toggle button from left (OFF) to right (ON). At that point forward, those events will now be reported throughout GA4 as conversions.
6. Check Your Enhanced Measurement Settings
GA4 offers enhanced measurement features in terms of automatic tracking of the following events: page views, scrolling, outbound clicks, site search, form interactions, video engagement and file downloads.
If you have a GA4 custom events tracking plan in place (which you should!), then we would recommend turning off all automatic events except for page views (which cannot be turned off) and site search.
To see what is currently activated, go to Admin then Data Streams, then click anywhere on the data stream entry itself, and then click on the “ ” symbol under the “Enhanced Measurement” section. If these settings haven’t been altered yet, you will most likely see the status of your automatic events listed like this:
While these automatic events are a nice touch, almost all of these are not needed if you have GA4 custom events tracking in place, as you cannot alter the settings of these automatic events or see what conditions are being used to trigger these automatic events.
Did you find yourself adjusting any of these settings? Do you feel like a more comprehensive review might be in store?
If you're unsure about conducting an audit yourself, you might want to consider involving a web analytics professional. If you’d like to learn more about how Liquid can assist your company with this very important review process, feel free to contact us to see how we can help you.